

1. Introduction
PRCY Checker is an advanced GUI tool to keep track of your Daemons like QT-Wallet, Masternode(s) and Staker(s).
It is written in Java and supported by Windows, Linux, Raspberry PI and Mac..
Features include:
• Watch over your Daemons like QT-Wallet, Masternode and Stakers.
• Test for Connections and add Connections when you have less than 3.
• Test for blockcount and E-mail if the difference is more than 20 blocks from the Explorer.
• Clear banned nodes automatically.
• Easily bootstrap your daemons (QT-Wallet).
• Run POA for Windows and Linux.
• Watch live Debug information and send extra commands.
• Start/Stop Daemons (QT-Wallet, only Stop)
• Edit prcycoin.conf and masternode.conf.
2. Installation
Before you start, join the telegram group https://t.me/prcychecker
There you will find Pinned Messages with the Download.
Follow the steps in this manual and you can setup and use PRCY-Checker easily.
2a. Windows Installation
1 – Download the ZIP file PRCY-Checker-Win.zip
2 – Extract the zip, which will create a new folder PRCY-Checker-Win
In this folder you will find the file PRCY-Checker.exe and a folder JRE.
JRE is the folder where we have the Java Runtime Environment.
No need to install Java on your system.
PRCY-Checker has to be started from this Folder.
Note: Do not move PRCY-Checker.exe without the JRE Folder. They have to both be in the same location.
You can make a shortcut if you like.
2b. Linux Installation
1a – For Linux Download the ZIP file PRCY-Checker-Linux.zip
1b – For the Raspberry PI Download the ZIP file PRCY-Checker-PI.zip
2 – Before you can start PRCY-Checker you have to install Java and JavaFX.
3 – Check what version of Java is on your Linux (PI).
In Terminal type
java –version
Result will be something like:
openjdk version “11.0.11” 2021-04-20
OpenJDK Runtime Environment (build 11.0.11+9-post-Raspbian-1deb10u1)
OpenJDK Server VM (build 11.0.11+9-post-Raspbian-1deb10u1, mixed mode)
Install Javafx: in Terminal type:
sudo apt-get install -y openjfx
If you don’t see this like other Linux builds then we have to install Java.
In Terminal type:
sudo apt install openjdk-11-jre-headless
Install Javafx. In Terminal type:
sudo apt-get install -y openjfx
4 – Extract the PRCY-Checker to your home folder.
When you have done this open this folder with the terminal and type:
sudo chmod +x *
2c. Mac installation
1 – Download the file PRCY-Checker-Mac.zip
2 – Extract the zip, which will create a new folder PRCY-Checker-Mac
In this folder you will find the file PRCYChecker.jar.
3 – Before you can start PRCY-Checker you have to install Java.
Download Java Runtime Environment (JRE) from https://www.java.com and install.
3. Wallet Settings
For all OS’s, the minimum Settings you need in prcycoin.conf are:
rpcuser=<Your Username>
rpcpassword=<Your Password>
rpcallowip=127.0.0.1
server=1
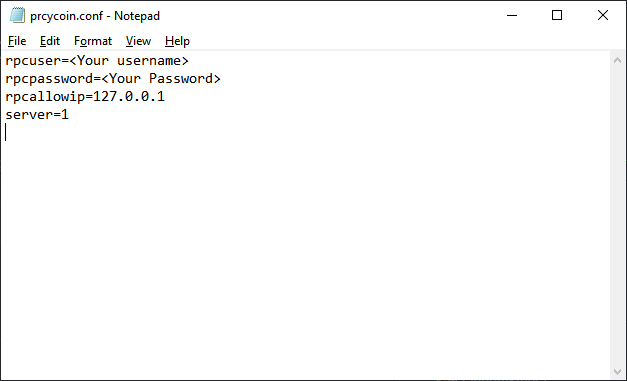
Explanation of each setting:
rpcuser: The username that will be used to accept commands from PRCY-Checker
rpcpassword: The password that will be used to accept commands from PRCY-Checker
rpcallowip: Allows Localhost to connect to the daemon
server: Make it a server so prcycoin-cli can talk to the daemon
The wallet/daemon must be restarted after changing these settings.
4. Basic Settings/Usage
Starting PRCY-Checker
For Windows: PRCY-Checker.exe
For Linux: Start-PRCY-Checker.sh
For Mac: PRCYChecker.jar
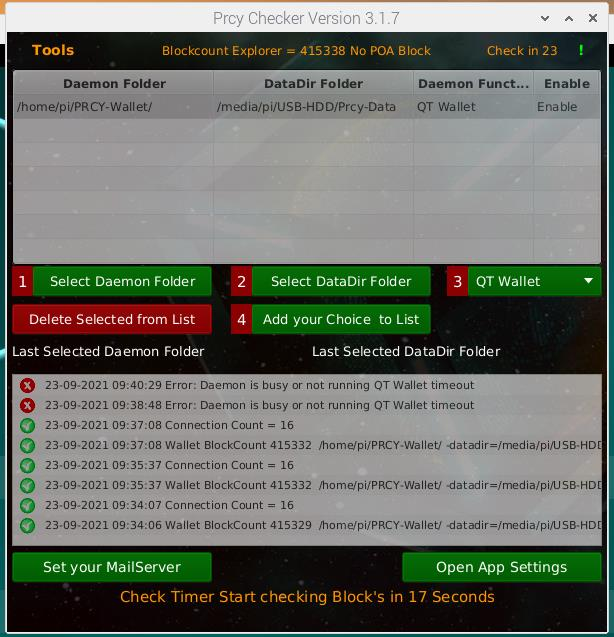
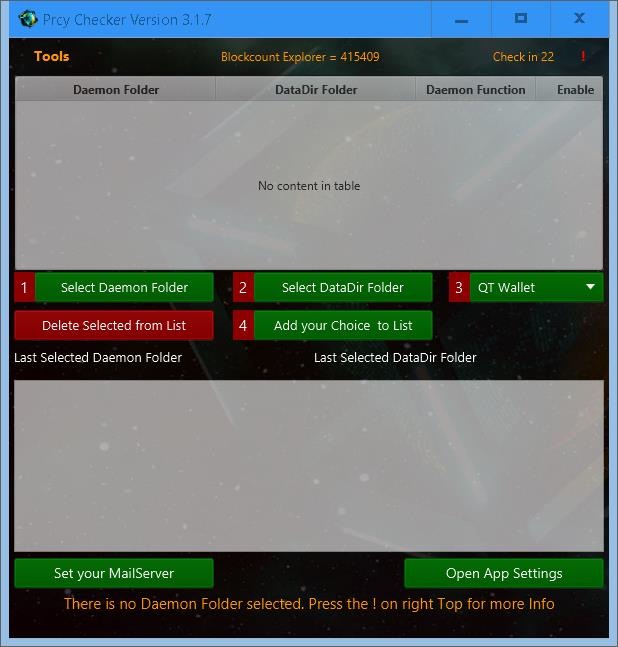
You will see the following screens:
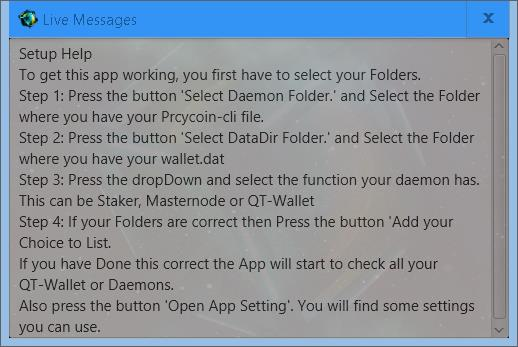
To add a Daemon (QT-Wallet) to PRCY-Checker you need to follow the steps below.
The text in the second window will always pop-up until they have been followed.
To get started, you first have to select your Folders.
Step 1: Press the button ‘Select Daemon Folder’ and Select the Folder where you have your Prcycoin-cli file.
For Windows: the Folder will open with the folder “C:\Program Files\PrcyCoin”
If you have the daemon in a different location you can go to this folder and select it.
For all other Systems the locations will be different.
Step 2: Press the button ‘Select DataDir Folder’ and Select the Folder where you have your wallet.dat
For Windows: this will open the Folder “C:\Users\yourname\AppData\Roaming\PRCYcoin”.
For all other Systems the locations will be different.
Step 3: Press the Dropdown and select the ‘Daemon Function’ of this wallet. (QT-Wallet, Staker, or Masternode)
Step 4: If your Folders are correct, press ‘Add your Choice to List’. PRCY-Checker will start to check this daemon.
If you have more than 1 Daemon, you can add more, useful for stakers and masternodes.
If you have not started your daemon (QT-Wallet) yet you will see following screen.

Start your daemon (or QT-Wallet) and you will see what is going on with it.
The Button ‘Open App Settings’ is to adjust some settings for PRCY-Checker.
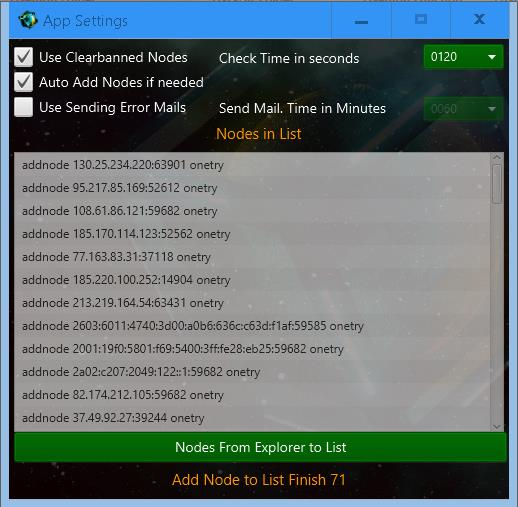
With a new installation, there will be some default checkboxes selected.
‘Use Clearbanned Nodes’ – when the connection count is too low, the app will use the command clearbanned.
‘Auto Add Nodes’ – can add nodes when connection count is too low.
You also can set the frequency in seconds that the app will check the daemons. Recommended value is 120 = 2 minutes.
The Add Nodes List is updated automatically every hour.
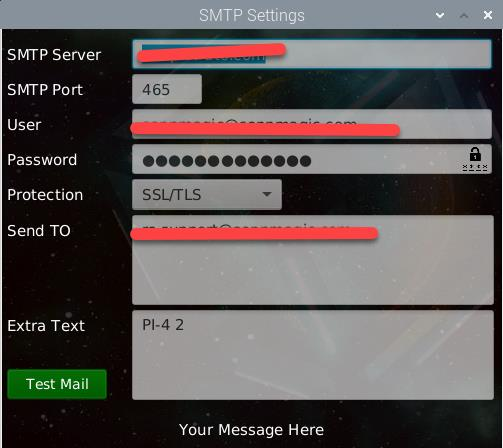
Use ‘Sending Error Mails’ is to send you an e-mail if you have setup the Mail Server.
If you enable this checkbox, you must also set the time in minutes.
The ‘Set your MailServer’ button will let you setup your SMTP Server, if you would like to receive e-mails.
It is recommended to use your own Provider’s SMTP settings.
5. Tools
The ‘Tools’ Menu that you can find on top of PRCY-Checker. Included options are:
• Start Bootstraper
• POA Miner for Windows and Linux (This will not shown on the Raspberry PI.)
• Open PrcyCoin Updates Page
• Open PrcyCoin Explorer
• Get your External IP ( Wan IP)
5a. Bootstrapper

This is the easy way to bootstrap a daemon or a QT Wallet.
• First, Select your daemon in the list
• You can shut it down with the ‘Shutdown Selected Daemon’ button (if not already)
• Double check if the daemon is really shutdown to avoid corruption.
• Click ‘Bootstrap Selected Damon’ and the download will start.
• The process log will be shown in the second list.
• Both buttons will be disabled from clicking until the bootstrap is finished.
Description of process:
• First, PRCY-Checker will download the bootstrap.
• Next, it will unzip, delete blocks, chainstate, peers.dat, banlist.dat and the folder database when this exists.
• After unzipping, the bootstrapper will start to bootstrap the selected daemon.
• Do not interrupt this process! Tt can even take some time to finish (this depends on the OS you are using).
• Once both buttons are enabled again, the bootstrap is finished.
If you have more than 1 daemon, you can bootstrap the next daemon after selecting it.
In this case, there is no additional download and bootstrapper will start bootstrapping the selected daemon.
If the bootstrapper is finished, you can close the bootstrapper.
The downloaded bootstrap will then be deleted to clear your storage.
5b. POA Miner
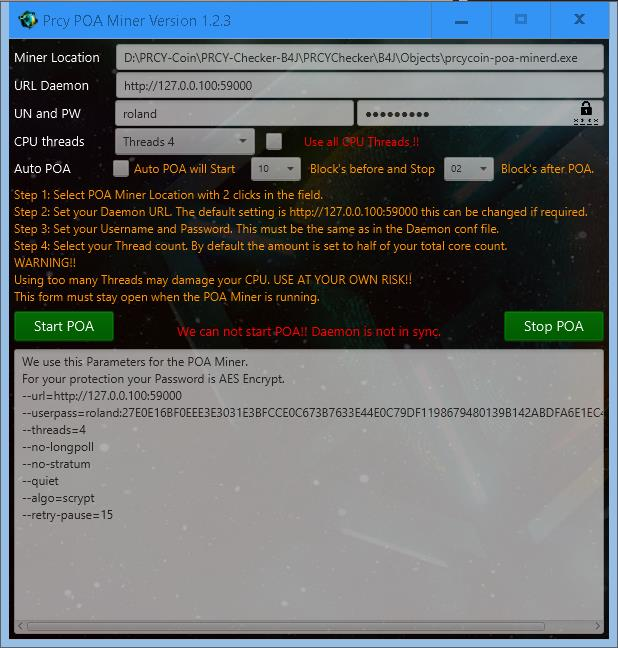
Read the text carefully before you start the POA Miner.
Follow the steps on the screen.
Step 1: Select POA Miner Location by double clicking the field.
Step 2: Set your Daemon URL. The default setting is http://127.0.0.100:59000 this can be changed if required.
Step 3: Set your Username and Password. This must be the same as in the Daemon conf file.
Step 4: Select your Thread count. By default the amount is set to half of your total core count.
WARNING!!
Using too many Threads may damage your CPU. USE AT YOUR OWN RISK!!
This form must stay open when the POA Miner is running.
If you have setup the POA Miner, you also can set ‘Auto PoA’.
This means that the Miner will start before the POA block and stop after the POA Block.
You also can start the miner manually.
5c. Updates Page
This will open your browser and let you download the latest PrcyCoin Version.
https://github.com/PRCYCoin/PRCYCoin/releases
5d. Explorer
This will open your browser
https://explorer.prcycoin.com/
5e. Get your IP
This will open your browser and show you your Wan IP address needed for masternodes.
https://www.whatismyip.com/
6. Advanced Settings/Usage
Right click on a daemon will show you the menu options you have.
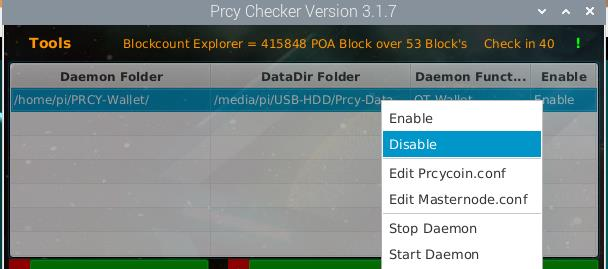
‘Enable’ means that the selected daemon will be checked by PRCY-Checker.
‘Disable’ means that this daemon will not be checked by PRCY-Checker. Useful if you have stopped a daemon.
‘Edit Prcycoin.conf’ will open a small editor where you can change some settings in prcycoin.conf for the selected
daemon.
‘Edit Masternode.conf’ also opens the editor where you can add your masternode info.
‘Stop Damon’ will stop your selected daemon.
‘Start Daemon’ will start stakers and masternodes. QT-Wallet cannot be started! You have to do this manually.
Double click on a selected daemon will open a debug form where you can see debug.log live.
Work in progress…
Choose your OS: Windows | Linux | macOS